
Development
How to do E-commerce with Stripe Checkout
Alejandro Schmeichler
In this practical development blog post I am going to show you how to take advantage of the extensibility features in JReviews to create an e-commerce solution for Joomla and WordPress, so you can sell products and services right from your listings, and without having to use a separate e-commerce platform and its associated overhead.
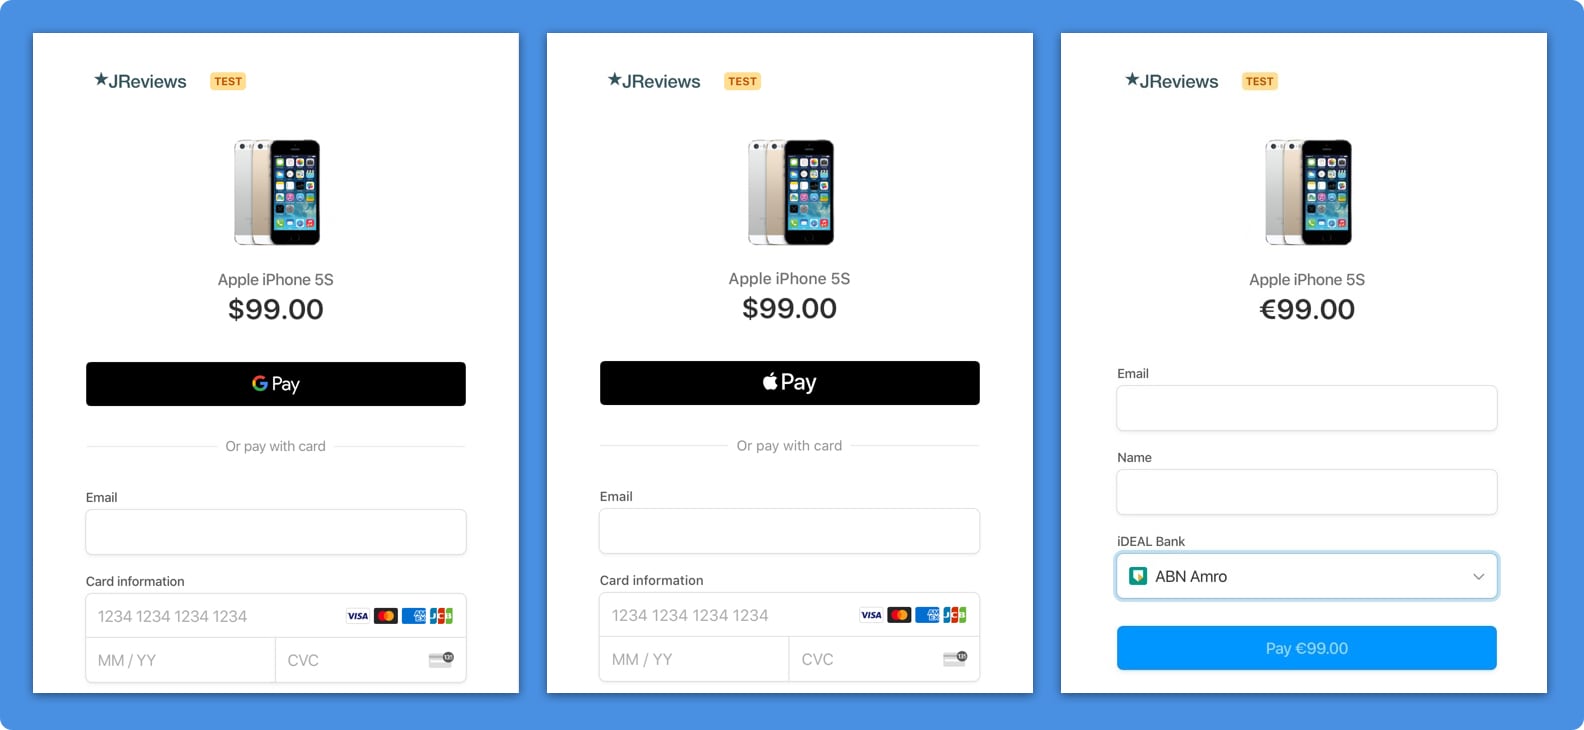
With this tutorial you'll be able to easily add a "Buy" button for one-time payments to your listings with Stripe payment processing and accept payments with Credit Card, Google Pay, Apple Pay and iDEAL.
Let's get started now, and remember that you can find the code for this and other development blog posts, as well as other useful customizations, on our Gist page on Github.
Accept Credit Card, Google Pay, Apple Pay and iDEAL payments
Stripe is a world leader in online payments, and their hosted checkout platform allows you to securely accept payments for products or services using JReviews listings without the need for a separate e-commerce solution and with very little effort on your part.
- Credit Card is the standard payment option for Stripe, giving you and your customers the most flexibility.
- Google Pay is now a standard option offered by Stripe when using their hosted checkout page without the need for any configuration.
- Apple Pay can be easily setup by uploading a verification file to your site and will be offered as a payment option to customers on Safari on web and mobile. Check the settings in your Stripe Dashboard.
- iDEAL allows you to accept payments from customers in the Netherlands allowing them to pay directly from their bank account. Below you'll find some configuration information needed to enable this feature within the code.
What you need to start selling with Stripe checkout in Joomla and WordPress
To be able to complete this tutorial you need:
- A Stripe account to process payments
- JReviews v3.6.4.1+
- Site needs to load via HTTPS, so you need an SSL certificate
- Server file access to your server to create the necessary folders and files.
Enabling checkout payments in your Stripe account
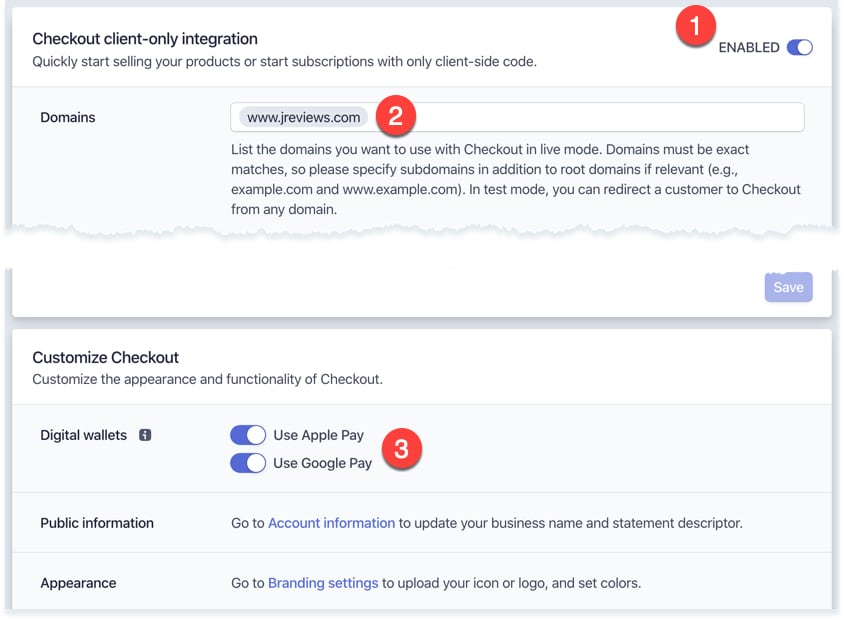
To implement the Stripe checkout hosted functionality, it has to be enabled on yoru Stripe dashboard. To do this log in to your Stripe account and then go to Settings / Stripe apps / Checkout settings. There you will enable "Checkout client-only integration", add your site's domain and toggle the Google Pay and Apple Pay features based on your needs.
If you enable Apple Pay, you also need to add a certificate to your site. Go to Settings / PAYMENTS AND PAYOUTS / Apple Pay and follow the instructions there.
On the same page, you'll find options to customize the checkout page under Appearance / Branding Settings, which allow you to change colors and add your logo.
Displaying a Buy button in listing detail pages
The first thing we need to do is display a Buy button in our listing detail pages, and only if the listing has a value for a pre-determined price custom field. So at this time, if you don't have a price field, go to the Fields Manager, and create a price field using an integer or decimal field type. If you want to use a new field group for the price, then you'll need to remember to associate the field group with your listing types.
Now, in the JReviews overrides folder you'll create a few files.
In Joomla create the following files:
/templates/jreviews_overrides/filters/stripe_config.php
/templates/jreviews_overrides/filters/filter_functions.php
/templates/jreviews_overrides/filters/stripe_checkout.php
/templates/jreviews_overrides/controllers/developer_controller_macros.php
In WordPress create the following files:
/jreviews_overrides/filters/stripe_config.php
/jreviews_overrides/filters/filter_functions.php
/jreviews_overrides/filters/stripe_checkout.php
/jreviews_overrides/controllers/developer_controller_macros.php
stripe_config.php
The first file is used to add some configuration information that you need to fill out to make sure everything works correctly. You can find the Stripe's private and secret keys in your Stripe dashboard, under Developers / API Keys. Below the code you should add to stripe_config.php
<?php
defined('MVC_FRAMEWORK') or die;

$stripe_config = [
    // Name of custom field you want to use for price information
    'price_field'           => 'jr_productprice',
    // Get the private and secret keys from your Stripe dashboard and add them below.
    'stripe_pk'             => 'pk_live_........................',
    'stripe_sk'             => 'sk_live_........................',
    // This appears in the client's credit card statement for the transaction
    'statement_descriptor'  => 'Statement Descriptor',
    'currency'              => 'usd',
    // Include 'ideal' in the array below if you enable iDEAL payments in the Stripe dashboard,
    // and set the currency to EUR which is required for iDEAL payments
    'payment_method_types'  => ['card'],
    // Set 'billing_address_collection' to 'required' to always collect customer billing info
    'billing_address_collection' => 'auto',
    // Can use stripe template var {CHECKOUT_SESSION_ID}
    // Create a success page on your site and update the URL below
    'success_url'           => 'https://your-domain/success-page',
    // Create a cancel page on your site and update the URL below. Leave null to go back to referrer page.
    'cancel_url'            => null,
    'buy_button_text'       => 'Buy now',
    'buy_button_css'        => 'jrButton jrBlue',
];
Enabling iDEAL payments
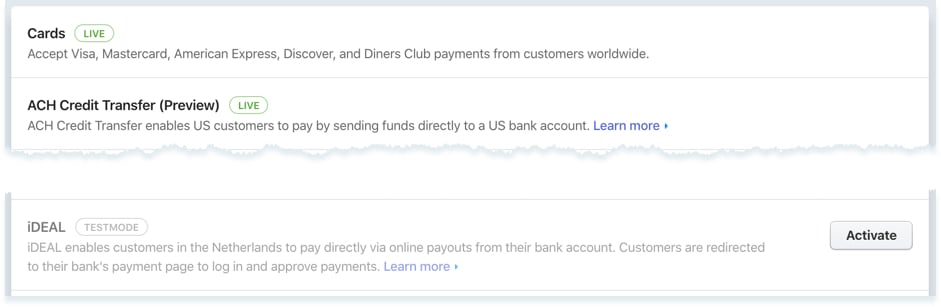
If you sell in EUR, you also have the possibility of accepting payments with iDEAL in addition to credit cards, or exclusively if you prefer. Make sure you change the currency to 'eur', and for the payment_method_types, add 'ideal' to the array, or replace 'card' with 'ideal'.
'payment_method_types' => ['card','ideal'],
Finally, you need to enable iDEAL payments in your Stripe account. Go to Settings / PAYMENTS AND PAYOUTS / Payment Methods, and activate it there.
filter_functions.php
The second file, filter_functions.php, is the entry point for JReviews Developer Filters and instead of placing all my filters in a single file, I prefer to use separate files for each filter to keep them more organized. So I'll be referencing the stripe_checkout.php filter from within the filter_functions.php file as follows:
<?php
defined('MVC_FRAMEWORK') or die;

require 'stripe_checkout.php';
I use two developer filters post_get_listing_detailpage_query and before_theme_render_viewvars_com_content_com_content_view in this file. The first one will be used to inject a virtual banner custom field to output the Buy button in the listing detail pages. While the second filter is used to add the necessary javascript code to the listing detail page to process the click of the button.
stripe_checkout.php
The 3rd file contains the code for the two filters above and you can find the code below. You can see that the configuration file is read the the beginning so we can use some of these values within the two filters.
<?php
defined('MVC_FRAMEWORK') or die;

require_once 'stripe_config.php';

$jreviewsCheckout = new JReviewsCheckout($stripe_config);

Clickfwd\Hook\Filter::add('post_get_listing_detailpage_query', [$jreviewsCheckout, 'store_add_buy_button'], 10);

Clickfwd\Hook\Filter::add('before_theme_render_viewvars_com_content_com_content_view', [$jreviewsCheckout, 'stripe_bootstrap'], 10);

class JReviewsCheckout {

    protected $config;

    public function __construct($config)
    {
        $this->config = $config;
    }

    public function store_add_buy_button($listing, $params)
    {
        // Only process if the listing has a price set
        if( !S2Array::get($listing,'Field.pairs.'.$this->config['price_field'].'.value.0',null) )
        {
            return $listing;
        }

        $auth = S2Object::make('auth');

        $field = ['jr_store_buy'=>[
                'field_id' => 99999,
                'group_id' => 'store',
                'name' => 'jr_store_buy',
                'type' => 'banner',
                'title' => '',
                'value' => ['banner'],
                'text' => ['banner'],
                // We pass the listing ID as a data attribute so it can be sent to the server
                // where we read the price and generate the Stripe checkout session ID
                'description' => sprintf('<a href="javascript:void(0)" class="jr-stripe-buy %s" data-id="%d">%s</a>', $this->config['buy_button_css'], $listing['Listing']['listing_id'], $this->config['buy_button_text']),
                'image' => [],
                'properties' => [
                        'show_title' => 0,
                        'location' => 'content',
                        'contentview' => 1,
                        'listview' => 0,
                        'listsort' => 0,
                        'search' => 0,
                        'access' => $auth->getAllAccessGroupId(),
                        'access_view' => $auth->getAllAccessGroupId(),
                        'output_format' => '{fieldtext}',
                    ],
            ]
        ];

        $group = ['store'=>[
            'Group'=>[
                'group_id'=> 'store',
                'title'=> 'Store',
                'name'=> 'store',
                'show_title'=>0
            ],
            'Fields'=>$field
        ]];

        if ( !empty($listing['Field']['groups']) )
        {
            $listing['Field']['groups'] = array_merge($group,$listing['Field']['groups']);
        }

        if ( !empty($listing['Field']['pairs']) )
        {
            $listing['Field']['pairs'] = array_merge($field,$listing['Field']['pairs']);
        }

        return $listing;
    }

    public function stripe_bootstrap($viewVars, $params)
    {
        // Only process if the listing has a price set
        if( !S2Array::get($viewVars,'listing.Field.pairs.'.$this->config['price_field'].'.value.0',null) )
        {
            return $viewVars;
        }

        cmsFramework::addScript('https://js.stripe.com/v3/', 'stripe-api');

        $asset_manager = S2Object::make('asset_manager');

        // The script below makes a request to DeveloperController::stripe_checkout, which is a custom
        // method that we will add using a controller macro. We send the listing ID with this request.
        $script = "
            var stripe = Stripe('".$this->config['stripe_pk']."');
            jreviews.stripeStore = {
                bootstrap: function() {
                    jQuery('body').on('click','.jr-stripe-buy',function(e) {
                        e.preventDefault();
                        jreviews.dispatch({
                            method:'post',
                            type:'json',
                            controller:'developer',
                            action:'stripe_checkout',
                            data:{ id: jQuery(this).data('id') }
                        }).then( res => {
                            if ( res && res.success ) {
                                stripe.redirectToCheckout({ sessionId: res.session_id }).then(handleResult);
                            }
                        })
                    });
                    var handleResult = function(result) {
                      if (result.error) {
                        console.log(result.error);
                      }
                    };
                }
            };
            if ( typeof head == 'function' ) {
                head.ready(function() {
                    jreviews.addOnload('stripe-bootstrap',jreviews.stripeStore.bootstrap);
                });
            } else {
                jreviews.addOnload('stripe-bootstrap',jreviews.stripeStore.bootstrap);
            }
        ";

        $asset_manager->addScript($script,'jreviews-stripe-checkout','addon');

        return $viewVars;
    }
}
Having completed all of the above steps, at this time, if you have a product page with a price filled in, you should be able to see the Buy button appear on the page. The name of the virtual field used for the button is jr_store_buy. If you prefer to customize the location of the Buy button, you can place it anywhere you want in the detail theme file, using the code below, per the documentation to customize the layout of custom fields.
<?php echo $CustomFields->field('jr_store_buy',$listing); ?>
To prevent the field output from appearing twice, make sure you also modify the filter code above to change 'contentview' to 0 instead of 1.
Creating the Stripe Checkout Session and redirecting to the Stripe hosted payment page
Stripe's functionality and API are amazing and they've made it even easier to integrate their payment solutions with a hosted payment page, which is what we'l be using for this tutorial.
When someone clicks the buy button, the javascript code reads the listing ID and sends a request to the server. We need some code on the server to received this request, get the price information from the listing, and make a call to Stripe to generate a checkout session ID. Once we have this session ID, we return it back to the browser and use the Stripe javascript API to redirect to their hosted payment page.
developer_controller_macros.php
So the last file, developer_controller_macros.php takes care of all this. There we are adding a new controller method that is called when the Buy button is cliked. You can find the code below:
<?php
defined('MVC_FRAMEWORK') or die;

require dirname(dirname(__FILE__)).DS.'filters/stripe_config.php';

DeveloperController::macro('stripe_checkout', function() use ($stripe_config)
{
    $config = $stripe_config;

    $client = new \GuzzleHttp\Client();

    if ( !($listingId = $this->params['id']) )
    {
        return $this->reponse->json()->not_found();
    }

    S2App::import('Component','listings_repository','jreviews');

    $listingRepo = (new ListingsRepositoryComponent())->startup($this);

    $listing = $listingRepo->whereListingId($listingId)->one();

    $price = S2Array::get($listing,'Field.pairs.'.$config['price_field'].'.value.0',null);

    if ( !$price )
    {
        return $this->response->json()->not_found();
    }

    $image = S2Array::get($listing,'MainMedia.media_info.image.url');

    $data = [
        'payment_method_types' => $config['payment_method_types'],
        'line_items' => [
            [
                'name' => $listing['Listing']['title'],
                'amount' => $price * 100, // Stripe works in cents
                'currency' => $config['currency'],
                'quantity' => 1,
                'images' => $image ? [$image] : [],
            ]
        ],
        'payment_intent_data' => [
            'description' => $config['statement_descriptor'], // Statement Descriptor
            'metadata' => [
               'listing_id' => $listing['Listing']['listing_id'],
               'title' => $listing['Listing']['title'],
               'user_id' => $this->auth->id,
               'name' => $this->auth->name
            ]
        ],
        // ,'customer' => '' // This needs to be a Stripe customer object
        'client_reference_id' => $this->auth->id,
        'success_url' => $config['success_url'],
        'cancel_url' => $config['cancel_url'] ?? cmsFramework::makeAbsUrl(cmsFramework::getCurrentUrl()),
    ];

    $response = $client->post('https://api.stripe.com/v1/checkout/sessions', [
        'auth' => [$config['stripe_sk'],''],
        'form_params'   => $data,
        'http_errors'   => false,
    ]);

    if ( $response->getStatusCode() == 200 )
    {
        $checkoutSession = json_decode((string) $response->getBody(),true);

        return $this->response->json()->array(['success'=>true,'session_id'=>$checkoutSession['id']]);
    }
});
You should now have a fully functional product page that allows you to sell using one-time payments with Stripe. This tutorial doesn't include any functionality for saving transaction data on your site. To keep things simple, I recommend using some of the fabulous Zapier Stripe integrations allowing you to automatically add transaction data to Google Sheets and Quickbooks, add users to mailing lists, send notifications, and much more.
If you have specific requirements to further extend this code, feel free to drop me an email using the ticket system or contact us page to see if I have availability for a paid project.
Enjoy!
Alejandro