When it comes to lists, many is better than one! The JReviews core comes with a single Favorites list for users to add their favorite listings. With MyLists there are no limits for site-defined and user-created public and private lists.
Overview
List Types
MyLists implements two types of lists:
-
Site Lists
Created by site admins, these are public in nature. Each list can be associated with ore or more listing type. The add-on includes a migration tool to move core favorites to a chosen site list.
-
User Lists
Created by end-users for their own use. Users can make their lists private. Configuration settings allow admins to decide whether to create private lists, if these should be automatically published, and if users should be able to make them private.
The add-on offers a couple of menus to show list related information:
-
User Lists
Shows a list of public user lists on the site, including information about who created the list and the number of items added to each list. Lists can be sorted date, number of listings or list title.
-
My Lists
Shows the logged in user's list, allowing members to manage their lists.
-
Catch All Menu
While not offering a direct functionality, this menu is needed to generate links for list pages to show the listings within the list. The meun must be created and published, but it doesn't have to be visible on the site.
When creating the menus in Joomla a single MyLists menu is shown, and the menu mode can be changed within the menu settings.
The add-on comes with two Joomla modules and WordPress widgets.
-
User Lists
Similar to the User Lists menu, it can show the user lists on the site ordered by newest, oldest, title or most listings. In listing detail pages, it can filter the results to only show lists that include the listing.
-
Site Lists
Only for use in listing detail pages, it can show the number of users that have added the current listing to a site list.
Getting Started
You can get started using the add-on with just a few steps:
-
Create the My Lists, User Lists and Catch All menus
Need a refresher on Creating Menus?
-
Migrate favorite listings to a Site List
This is an optional step. Create the new site list and use the Maintenance & Migration page in the add-on to migrate the favorites to this list.
Test the migration by visiting My Lists menu. You should see the site list there with a link to view your favorites within the list.
-
Create additional site lists
It's possible to create new site lists at any time.
-
Review configuration settings
In addition to fine-tuning display options, you can also choose whether users can create their own lists, make them private and have them auto-published or sent to moderation.
Enabling Lists for Listing Types
In configuration settings it's important to select the listing types for which the Add to List dropdown will be shown. Unselected listing types will not have the MyLists functionality available to them.
Adding to and Creating Lists
After completing the setup, visit any listing with a listing type enabled for the add-on, and find the Add to list dropdown. You can add listings to existing site lists and begin creating your own user lists.
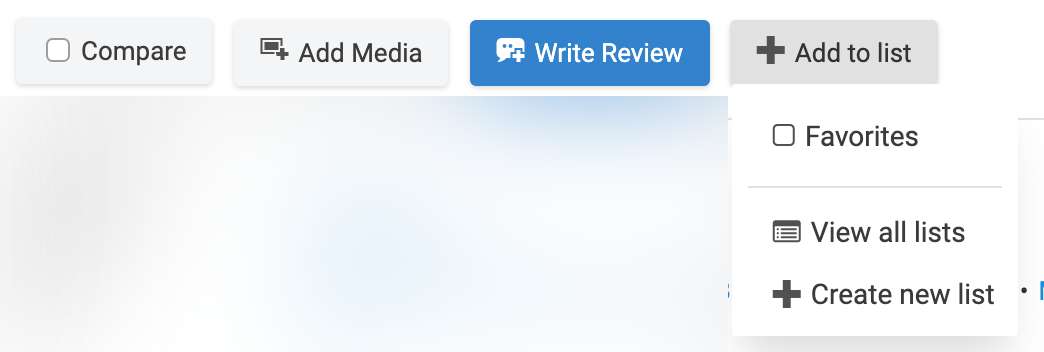 Add to list dropdown for adding to existing lists and creating user lists
Available since MyLists 3.0.0
Make your site lists shine by showing them front-and-center with creative layouts. Below you can see some examples of different ways in which site lists can be shown, outside of the Add to List dropdown menu. It's even possible to connect two lists (e.g. Like and Dislike).
Add the moment, the implementation relies on filter hooks. Read the Developers Hooks article if you haven't used hooks before, or to refresh your memory. There you'll find instructions for creating the necessary filter_functions.php file in overrides, and suggestions for organizing your hooks. We recommend placing the code for list buttons in a separate file that you require once from filter_functions.php.
You can get your site lists showing in a few steps:
-
Assign icon names to lists
Define icon names (e.g. heart, thumbsup, thumbsdown, etc.) and assign them to list IDs.
SiteListButtons::assignIconsToLists([1 => 'heart']);
-
Register icons
For each icon name you will register the on and off states for the HTML output for the icon, which can be a regular image, or an SVG. You can include a class attribute in your image or svg tag and it will be used as the default, unless overriden with icon-class when registering a layout. Here's a few free SVG icon resources you can explore: Heroicons, Ionicons, Eva Icons.
SiteListButtons::registerIcon('heart',[$offStateHTML, $onStateHTML]);
-
Register layouts
You can show buttons in any layout you want (e.g. button, circular icon with an outline, or filled, etc.). For the most flexibility, you define layouts with attributes and later assign them to each list.
Below the simplified layout for the list button, where <icon> is used to represent the HTML image or SVG icon. Below a generic example of a site list button output. The class names are not real, they are replaced with the values provided in the corresponding attributes.
<a href="#" class="button-class button-on-class button-off-class">
    <icon class="icon-class icon-on-class icon-off-class" />
    <span>Favorite</span>
</a>
And this is the code for defining a layout:
SiteListButtons::registerLayout('circle-outline-red', [
	'show-label' => false,
	'button-class' => 'fwd-p-2 fwd-inline-flex fwd-rounded-full fwd-border-2 fwd-border-solid fwd-transform hover:fwd-scale-110 fwd-duration-300',
	'button-on-class' => 'fwd-border-red-600 fwd-bg-red-500 hover:fwd-bg-red-400',
	'button-off-class' => 'fwd-border-gray-300 fwd-bg-white',
	'icon-class' => 'fwd-w-6 fwd-h-6',
	'icon-on-class' => 'fwd-text-white',
	'icon-off-class' => 'fwd-text-gray-400 hover:fwd-text-red-400',
]);
The CSS classes shown are available in JReviews, but you can use any CSS class you want. You can also use the show-label attribute to hide the list label.
-
Register list groups
A list group consists of one or more lists that are output together. You can assign a different layout to each list, hide the text label for all lists within the group, and set an outer CSS class for the group.
SiteListButtons::registerListGroup('favorite',[
	'lists' => 1,
	'showLabel' => false,
	'layout' => 'circle-outline-red',
]);
To include several buttons within the same list group (e.g. Favorite, Like, Dislike), pass an array to the layout attribute.
SiteListButtons::registerListGroup('favorite',[
	'showLabel' => false,
	'layout' => [
      	1 => 'circle-outline-red',
      	2 => 'circle-outline-teal',
      	3 => 'circle-outline-teal',
      ]
]);
-
Show buttons
Buttons can be shown in the listing detail page, list pages, and the listings module/widget. A helper function is available and it receives the $listing array and the list group name.
<?php echo mylists_show_buttons($listing, 'favorite'); ?>
There's a couple of optional steps available as part of the initialization for the site list buttons:
-
Register connected lists
Connected lists come in pairs and can limit a listing to be added to just one of the connected lists. If necessary, the listing will be automatically removed from the other list. For example, this can be used for Like (2) and Dislike (3) lists:
SiteListButtons::registerConnectedLists([2,3]);
-
Remove lists from dropdown
If you are showing lists as buttons, you have the option of hiding them in the Add to List dropdown. Connected lists are automatically removed from the dropdown because this feature doesn't work there, so there's no need to remove them directly. To remove the the Favorite list with ID 1:
SiteListButtons::removeFromDropdown([1]);
Putting it all together. Below you can find the entire code to automatically show the favorite button in lists and detail pages using the listing_detail_action_buttons_extras and listing_list_action_buttons_extras. We use the mylists_show_buttons helper function to output the list groups.
<?php
defined('MVC_FRAMEWORK') or die;

use Clickfwd\Hook\Action;
use Clickfwd\Hook\Filter;
use JReviews\Addons\MyLists\SiteListButtons;

Action::add('site_init',function()
{
  	// The Favorite Site List has an ID of 1 in this example
  	SiteListButtons::assignIconsToLists([
	    1 	=> 'heart',
	]);

  	// Remove list from Add to List dropdown - optional
  	SiteListButtons::removeFromDropdown([1]);

	SiteListButtons::registerIcon('heart',[
		'<svg fill="none" viewBox="0 0 24 24" stroke="currentColor">
			<path stroke-linecap="round" stroke-linejoin="round" stroke-width="2" d="M4.318 6.318a4.5 4.5 0 000 6.364L12 20.364l7.682-7.682a4.5 4.5 0 00-6.364-6.364L12 7.636l-1.318-1.318a4.5 4.5 0 00-6.364 0z"></path>
		</svg>',
		'<svg viewBox="0 0 20 20" fill="currentColor">
			<path fill-rule="evenodd" d="M3.172 5.172a4 4 0 015.656 0L10 6.343l1.172-1.171a4 4 0 115.656 5.656L10 17.657l-6.828-6.829a4 4 0 010-5.656z" clip-rule="evenodd"></path>
		</svg>'
	]);

	SiteListButtons::registerLayout('circle-outline-red', [
		'show-label' => false,
		'button-class' => 'fwd-p-2 fwd-inline-flex fwd-rounded-full fwd-border-2 fwd-border-solid fwd-transform hover:fwd-scale-110 fwd-duration-300',
		'button-on-class' => 'fwd-border-red-600 fwd-bg-red-500 hover:fwd-bg-red-400',
		'button-off-class' => 'fwd-border-gray-300 fwd-bg-white',
		'icon-class' => 'fwd-w-6 fwd-h-6',
		'icon-on-class' => 'fwd-text-white',
		'icon-off-class' => 'fwd-text-gray-400 hover:fwd-text-red-400',
	]);

	SiteListButtons::registerLayout('fill-red', [
	  'icon-class' => 'fwd-w-4 fwd-h-4',
	  'icon-off-class' => 'fwd-text-gray-400',
	  'icon-on-class' => 'fwd-text-red-600',
	]);

	SiteListButtons::registerListGroup('circle-outline',[
		'lists' => 1,
		'showLabel' => false,
		'layout' => 'circle-outline-red',
	]);

	SiteListButtons::registerListGroup('button',[
		'lists' => 1,
		'outerClass' => 'fwd-mb-3 fwd-inline-flex fwd-space-x-0',
		'layout' => 'fill-red',
	]);
});

function mylists_include_site_list_buttons($buttons, $params)
{
	if ($output = mylists_show_buttons($params['listing'], 'button'))
	{
		$buttons[2][] = $output;
	}

	return $buttons;
}

Filter::add('listing_detail_action_buttons_extras', 'mylists_include_site_list_buttons');

Filter::add('listing_list_action_buttons_extras', 'mylists_include_site_list_buttons');
To show the circle outline group in your listings, you can use the code below in your JReviews templates, and the same code can also be used in listing banner custom fields./
<?php echo mylists_show_buttons($listing, 'circle-outline'); ?>
Below you can find a complete example that defines layouts like the ones shown at the beginning of this section, for favorite, like and dislike lists with IDs 1, 2, and 3 respectively.
Available Hooks
The add-on implements hooks that can be used to modify and extend its functionality.