PaidListings
Use PaidListings to sell listings and premium features for listings.
Overview
The add-on integrates seamlessly with JReviews to allow you to charge users for submitting listings and upgrading listings with more features (featured state, custom fields, # field options per field).
FAQ
Q: Can I sell different types of listings at different prices?
A: Yes, you can create pricing plans for different categories and assign different plans to different categories.
Q: Can I offer trial periods?
A: Yes, you can create free/trial plans with specific durations.
Q: Can I accept recurring payments?
A: Yes, subscription payments are available with PayPal and Stripe payment handlers.
Q: Can I offer coupons and discounts?
A: Yes, the add-on includes a comprehensive coupon system with various restrictions.
Getting Started
To begin using PaidListings you should already have an initial setup of JReviews with existing categories.
If you are just starting out and don't have any listings on your site:
- Create a menu for PaidListings My Account to allow users to manage their paid listings.
- Create pricing plans and associate them with existing categories.
- Setup and enable at least one payment handler. Can be
Offlineto simplify testing.
Creating Orders for Existing Listings
If you already have listings and want to convert existing categories into paid categories it is necessary to add a default order for these listings. Listings without orders in a paid category will not show custom fields and its media will be unpublished.
Follow these steps:
-
Create at least one free pricing plan and assign it to the categories that have listings
To prevent the listings from automatically expiring, set the plan's duration to
Never Expires. -
In the Pricing Plans page, click
Create Ordersfor this free plan to generate the orders for pre-existing listings.
Menus
Create the menus for the Add-on. The Add-on has a couple of menus:
-
My Account (required)
Allows users to view and manage their paid listings, orders, invoices and account information.
-
Paid Categories (optional)
Show pricing plans available by category. It's possible to have more than one menu of this type with different pre-selected categories.
Pricing Plans
The add-on offers two types of pricing plans, with three different payment options.
Plan Types
-
Base
Available for new listing submissions, and optionally for upgrading a free plan when the option is selected in the plan settings.
-
Upgrade
Available as upgrade for listings with a base plan. Useful to sell more fields, media, and featured status. Upgrades can be exclusive, so they cannot be combined with other upgrades, and they can also be tied to specific base plans.
Payment Types
-
One Time
Users pay once, with an option to renew for plans that expire.
-
Subscription
Users are charged on a recurring basis using the plan's duration. If a payment fails or the user cancels the subscription the listing won't be automatically renewed upon expiration.
-
Free/Trial
Users can submit listings for free and listings remain published for the plan's duration.
Plan Expiration
When a Base plan is set up with a duration you must also choose what happens with the listing once the order expires:
- Create a new free/trial order
- Unpublish the listing
In both cases users' can renew, or switch plans, before and after the listing expires. When a listing is unpublished, it will no longer be indexable by search engines and any internal or external links pointing to that listing no longer work.
Payment Handlers
Out of the box the Add-on includes payment handlers for:
- Offline - one time, can be used for manual processing of payments (check, bank transfer, etc.)
- PayPal - one time and subscriptions
- 2Checkout - one time
- Stripe - one time and subscriptions, requires Stripe Payments Add-on
- Mollie - one time, requires Mollie Payments Add-on
- Coinbase - one time, requires Coinbase Payments Add-on
- EasySocial - one time with points
- JomSocial - one time with points
Configuring Payment Handlers
You can update each payment handler to change its name and image. Some of the handlers require additional configuration.
Review the settings for each enabled handler to make sure the setup is complete.
Offline Payments
To process an order submitted using the Offline payment option, you need to edit the order in the Orders page in the add-on administration, check the box Successful OFFLINE payment and save the order.
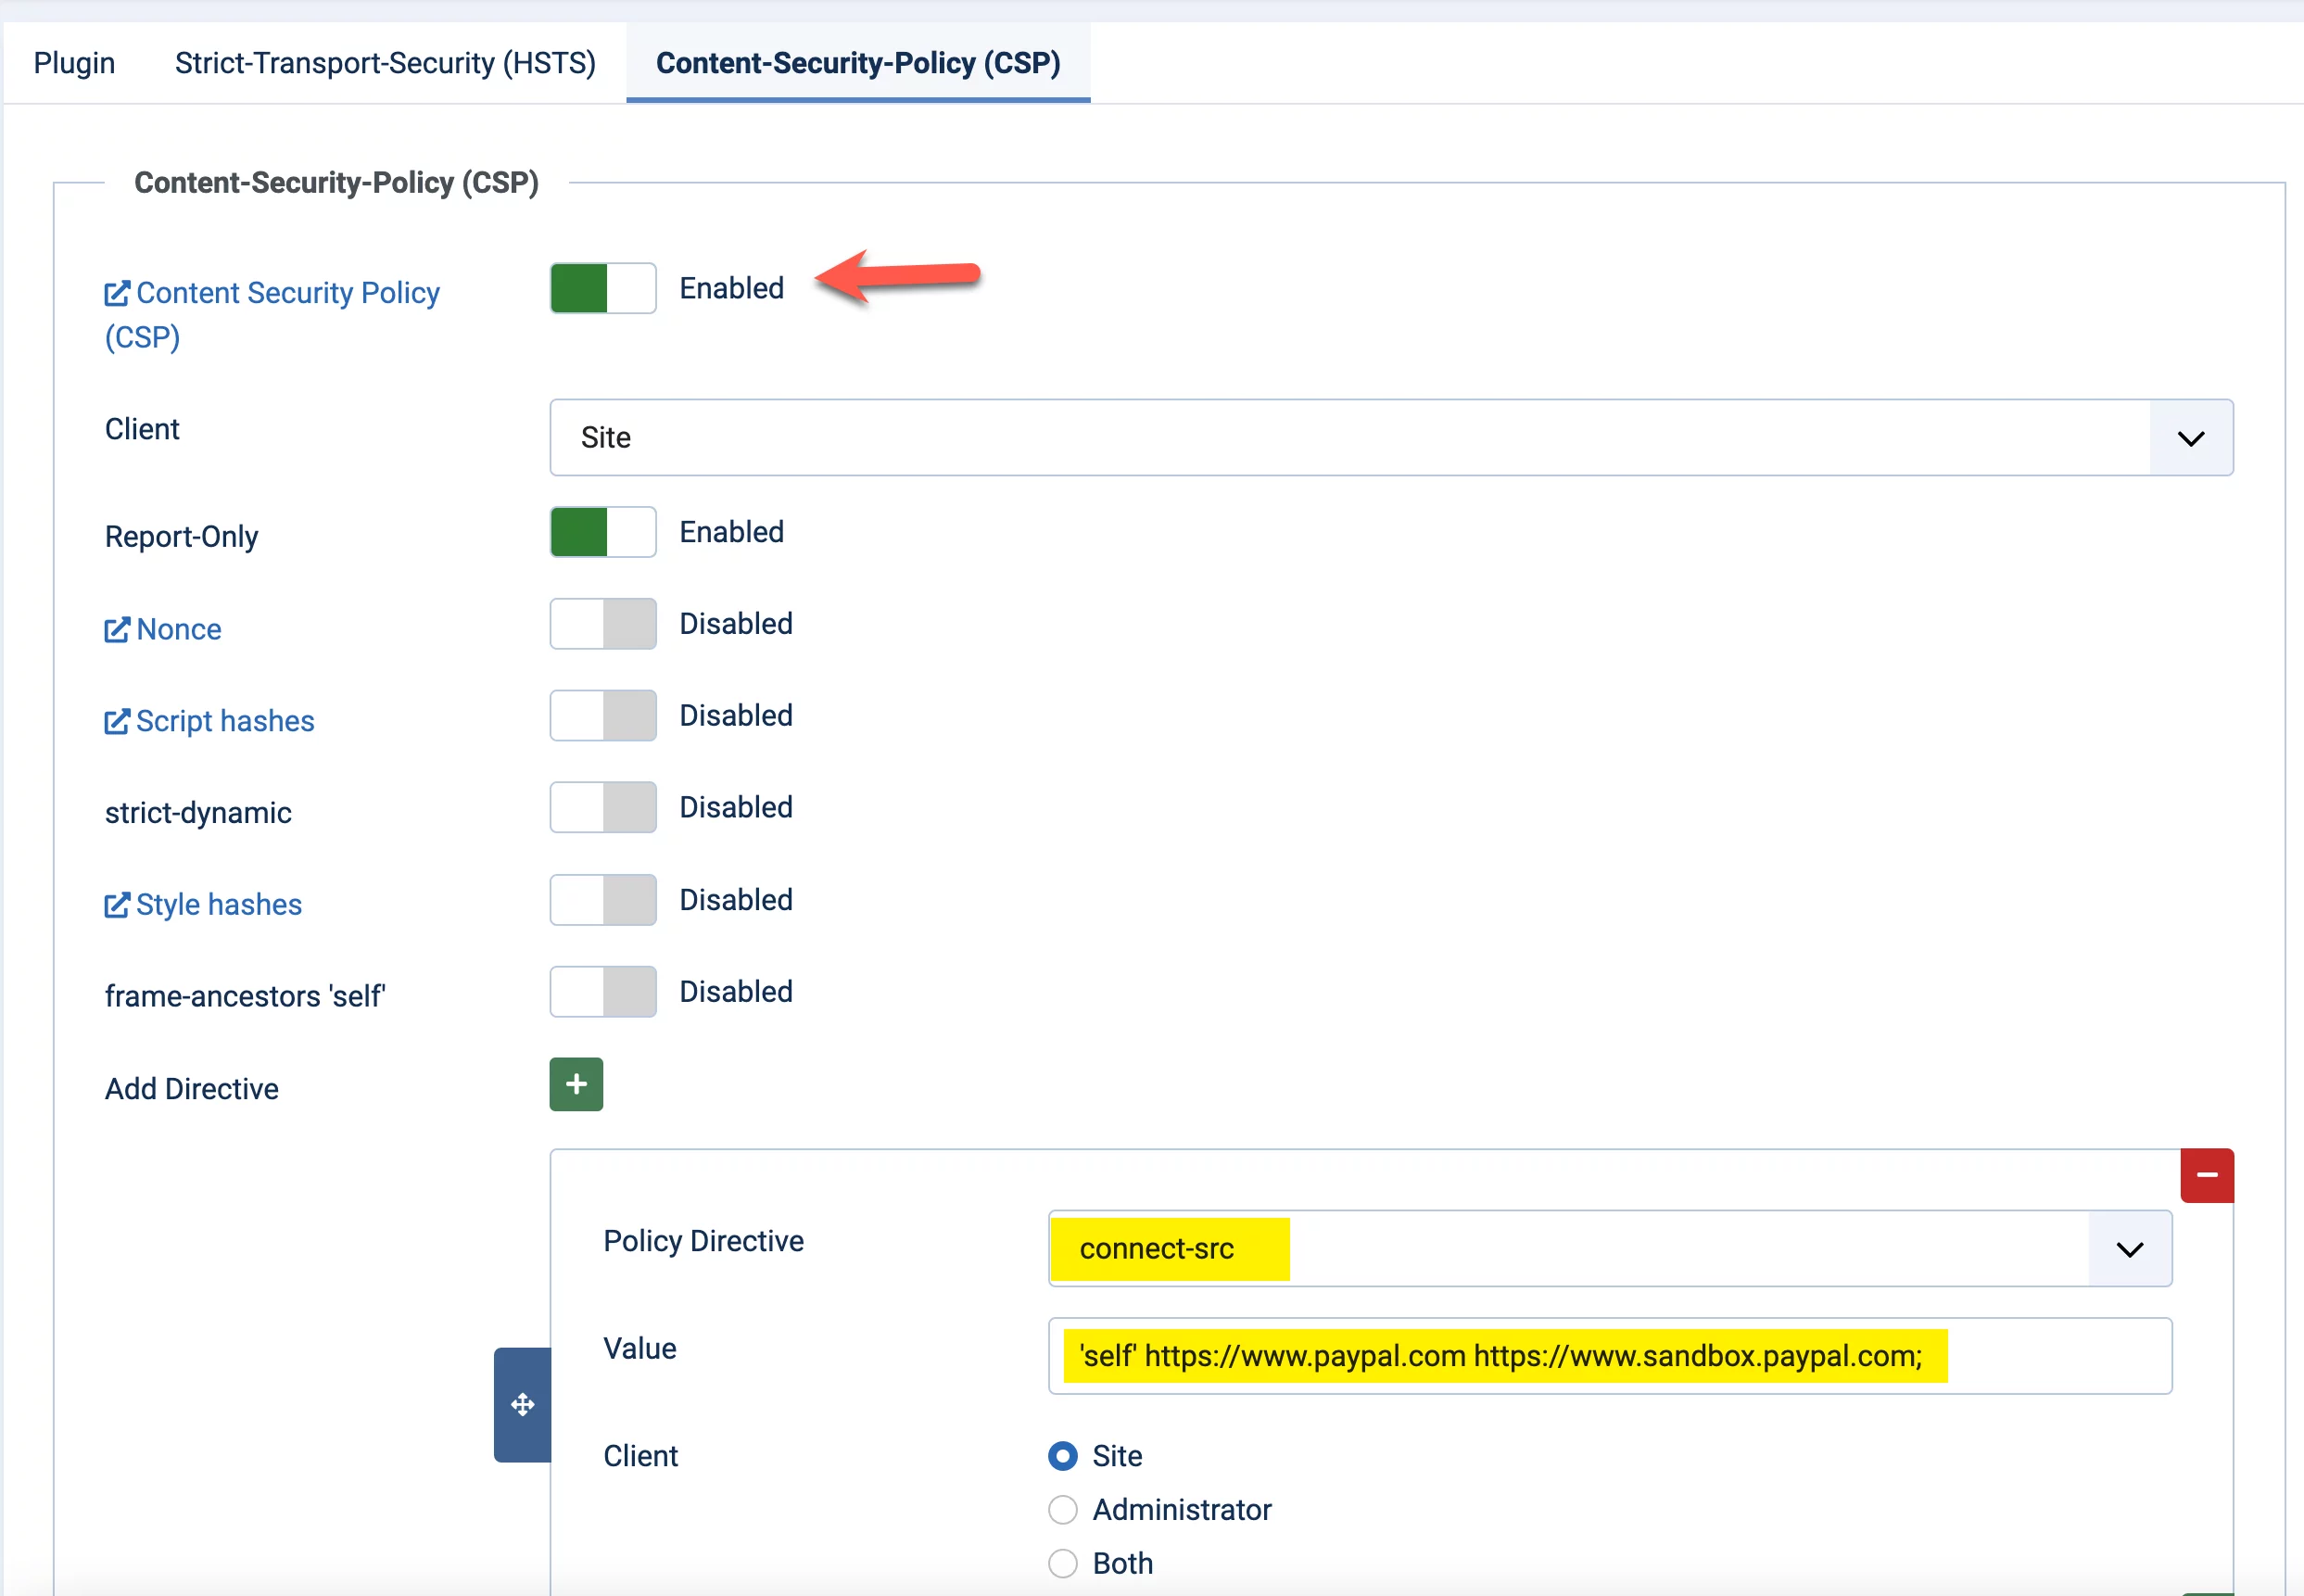
Content Security Policy (CSP)
When using Joomla 4, the HTTP Headers Plugin automatically blocks requests that are not from the same origin using the X-Frame-Options header. This means that payment handlers that redirects back to your site with a post request, instead of a simple link, will cause the user to be automatically logged out.
This is the case with the addon implementation for PayPal which returns the user to your site using a post request. The best workround we've found for this so far is to allow the requests from PayPal using a Content-Security-Policy header with the connect-src directive to specify which sources can connect to your site.
In the plugin, go to the Content-Security-Policy (CSP) tabForce HTTP Headers.
- Enable
Content Security Policy (CSP) - Disable
frame-ancestors 'self' - Click to add a new directive:
- Policy directive
connect-src
- Value
'self' https://www.paypal.com https://www.sandbox.paypal.com;
- Policy directive
This will allow requests from your own site, and from PayPal and the PayPal sandbox domain.
Taxes
In the taxes page in the add-on administration you will find options for setting up a single standard tax rate to be applied to all orders, or you can also enable EU taxes and set individual taxes to be charged to individuals for each country.
It's also possible to set whether the tax is bundled into the plan's price or added on top of it.
Notifications
The Add-on can send notifications for many different actions, including order and payment confirmations and expiration reminders. All of these can be toggled on and off so make sure you review them in detail in the add-on administration. You can also customize the email subject and body for each of these notifications and use pre-defined tags in them.
Order Expiration
Expiration notifications and automatic order expirations are processed periodically using the JReviews Cron. If you didn't set tha up initially, now is a good time to do it.
You can adjust the interval at which these are processed in Configuration → Cron in the add-on administration.
In Configuration → Expiration Notifications you can also modify the number of days in advance that users are notified their expiring orders. The First expiration notification days is also used to decide how soon the Renewal option appears for users in the Account page.
Coupons
The coupon functionality is quite flexible, allowing you to provide discounts for listings. When placing an order, users will have the option to add a coupon code and apply it in the final step of the checkout process when they are presented with the order summary.
Creating a coupon couldn't get any easier. Go to the coupons page and click New. Then fill out Name, Discount %, enable the coupon and Save. You are done.
There are many options to restrict coupon usage, and all of them are optional. You can restrict them based on:
- All purchases, or renewals only
- Start and End dates
- Number of uses per user or sitewide
- Users
- Pricing plans
- Categories
To allow administrators or designated users to submit new paid listings without payment and without the need for further admin-side processing, you can create a 100% discount coupon and limit it to those users.
Tracking Code
The add-on allows adding Javascript code to be run after pre-defined actions. This can be used for analytics and even to add affiliate tracking code. You can find the settings in Configuration → Tracking.
Below you can find a list of the available actions, and code snippets for integration with Google Analytics, which should already be loaded on the page.
-
Paid Category Selection in Submit Listing Form
User selects a paid category when submitting a listing. No tags available.
<script> try { ga('send', 'pageview', '/paid-category-selected'); } catch (err) { console.error(err.message); } </script> -
Submit Listing
Plan selected and listing submitted. Valid tags:
{order_amount},{plan_name}.<script> try { ga('send', 'pageview', '/listing_submission'); } catch (err) { console.error(err.message); } </script> -
Order Form
Order form dialog shown, user can change plan so no tags available.
<script> try { ga('send', 'pageview', '/order_form'); } catch (err) { console.error(err.message); } </script> -
Submit Order
Order submitted. Valid tags:
{order_amount},{order_id},{plan_name}.<script> try { ga('require', 'ecommerce'); ga('send', 'pageview', '/order_submission'); ga('ecommerce:addTransaction', { 'id': {order_id}, 'revenue': {order_amount} }); ga('ecommerce:addItem', { 'id': {order_id}, 'name': '{plan_name}' }); ga('ecommerce:send'); } catch(err) { console.error("Error tracking Order Submission:", err.message); } </script> -
Order Complete
Order complete page. Valid tags:
{order_amount},{order_id},{plan_name}.<script> try { ga('require', 'ecommerce'); ga('send', 'pageview', '/order_completed'); ga('ecommerce:addTransaction', { 'id': {order_id}, 'revenue': {order_amount} }); ga('ecommerce:addItem', { 'id': {order_id}, 'name': '{plan_name}' }); ga('ecommerce:send'); } catch(err) { console.error("Error tracking Order Complete:", err.message); } </script>
Pushing New Fields To Plans & Orders
So you have everything up and running, but wait! You need to add a few more custom fields to your setup. That's not a problem, but in order to get those fields to be recognized by paid listings you need to do a couple of things:
- Update your pricing plans and select the new fields for the plans where you want to include them.
- After saving the plans, use the
Update Ordersicon for each plan to push the updated info to existing orders.
Admin Order Creation
If you need to manually create or upgrade a listing for any site user, find the Create Order menu in the add-on administration sidebar.
Search for the listing, click on Order or Upgrade to select a plan and place the order.
Before placing the order, check the Process the order with a price of zero. checkbox to ignore the order amount. This can be useful when creating orders for existing listings where an actual payment is not taking place.
If you are submitting new paid listings as an administrator, you can also use the 100% discount coupon mentioned in the Coupons section. This approach automatically processes the order and marks it as completely, without the need for further action.
Customizations
The following customization options are useful to show information or enable features only for listings with paid plans, with specific custom variable values, or specific plan IDs.
There are several examples available in the hooks section using these methods.
Using Plan Variables
Custom variables provide additional flexibility to pricing plans. Variables are available in templates so they can be used for customizations. For example, to show/hide specific page elements based on the variables present in a plan, or to enable or disable certain features using filters.
To set custom variables, edit your pricing plans and in the Advanced tab add the variable name and variable value in this format:
inquiries|1
resources|1
In templates and hooks you can use the PaidHelper::getVar method to access custom variables like this:
<?php if (PaidHelper::getVar('inquiries', $listing) == 1): ?>
  // Custom code
<?php endif; ?>
In a Custom Field's PHP Format you can replace $listing with $entry
if (PaidHelper::getVar('inquiries', entry) == 1)
{
  // Custom code
}
Directly Accessing Paid Array
A Paid array containing active orders and plan ID information is automatically added to paid listings. You can use this information directly for your customizations. In templates and hooks you can access the array via $listing['Paid'] and in the custom fields PHP format you can use $entry['Paid'].
For example you can use the PHP array intersect function to find out if a listing's active plan IDs include specific IDs.
Below we check if the current listing plan IDs include plans 1, 2, or 3.
if (array_intersect([1,2,3], $listing['Paid']['plan_ids']))
{
  // Custom code
}
Custom Lists
You can add filters to retrieve paid listings with specific plan IDs using Custom Lists.
For example, using the custom where setting you can filter listings for one or more plan IDs like this:
Joomla
Listing.id IN (
  SELECT DISTINCT listing_id FROM #__jreviews_paid_orders WHERE order_active = 1 AND plan_id IN (1,2,3)
)
WordPress
Listing.ID IN (
  SELECT DISTINCT listing_id FROM #__jreviews_paid_orders WHERE order_active = 1 AND plan_id IN (1,2,3)
)
The above will only show listings with plan IDs 1, 2, or 3.