Stripe Payments
Easily start accepting credit card payments with Stripe inside the PaidListings Add-on. Stripe payments works with one-time payment and subscription plans.
Setting up Stripe payments requires several steps, which are explained in detail below.
Requirements
Stripe only works over an encrypted connection, so you need an SSL certificate for your site and serve pages through HTTPS.
Setup Stripe Handler
After installing the Add-on, go to the Stripe Handler handler in Add-ons → PaidListings → Payment Handlers → Stripe.
Setting up the Stripe Handler will require copying keys from your Stripe account dashboard to the Stripe Handler in PaidListings, and vice-versa.
Stripe Publishable and Secret Keys
The first step is to copy the Stripe API Publishable and Secret Keys from the Stripe Dashboard to the Stripe Handler dialog. These keys allow the Add-on to communicate with your Stripe account through API requests. Go to Stripe Dashboard → Developers → API Keys, and there under Standard Keys you can find the two values Publishable Key and Secret Key.
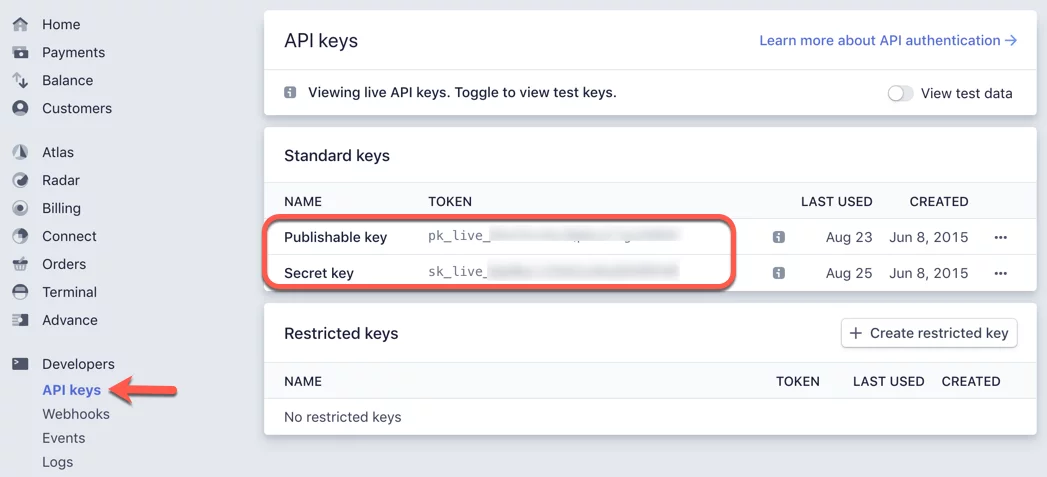
Copy these values to the corresponding settings in Add-ons → PaidListings → Payment Handlers → Stripe as shown below.
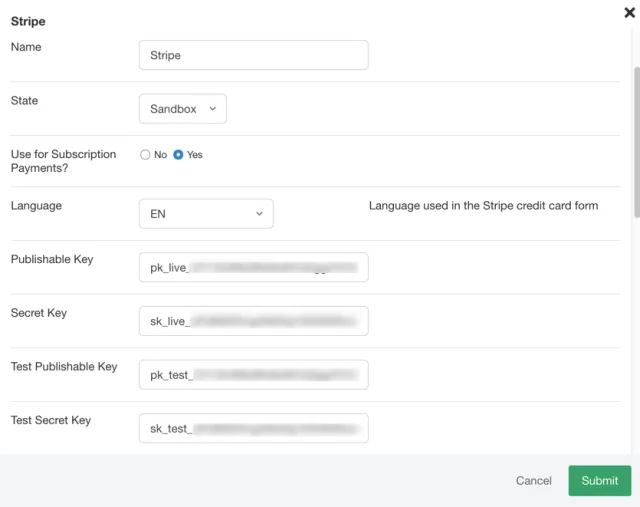
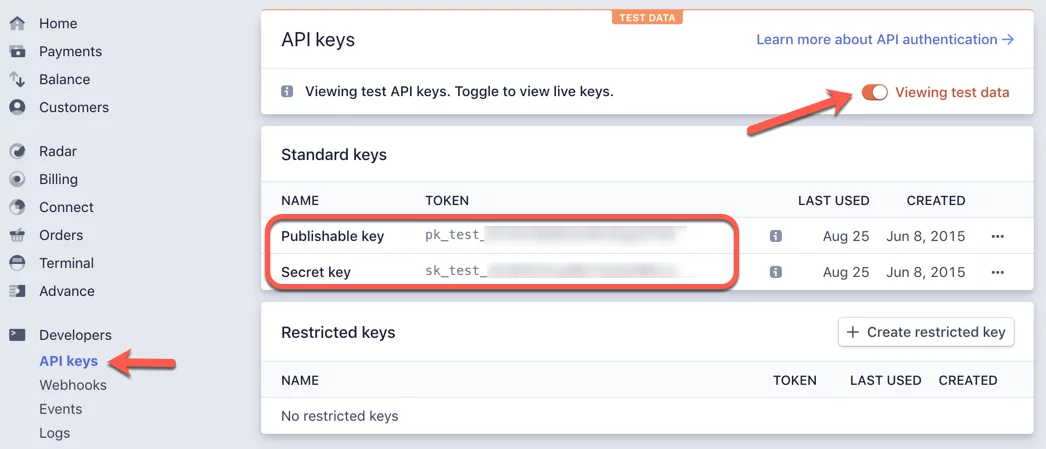
In the dialog there are settings for Test Publishable Key and Test Secret Key. These allow you to make payments with testing credit cards. If you want to setup the test payments you will go back to the Stripe Dashboard and in the API Screen click on View test data to toggle the test keys and copy those back to the Stripe Handler dialog.
Stripe Webhook
To complete the setup you need to create a new webhook in the Stripe Dashboard that will allow Stripe to send requests to your site that will be processed by the Add-on. These allow the Add-on to process orders on successful payments and to send the necessary notifications to your clients.
To create the webhook go to Stripe Dashboard → Developers → Webhooks then click on Add endpoint, which openn the dialog shown below.
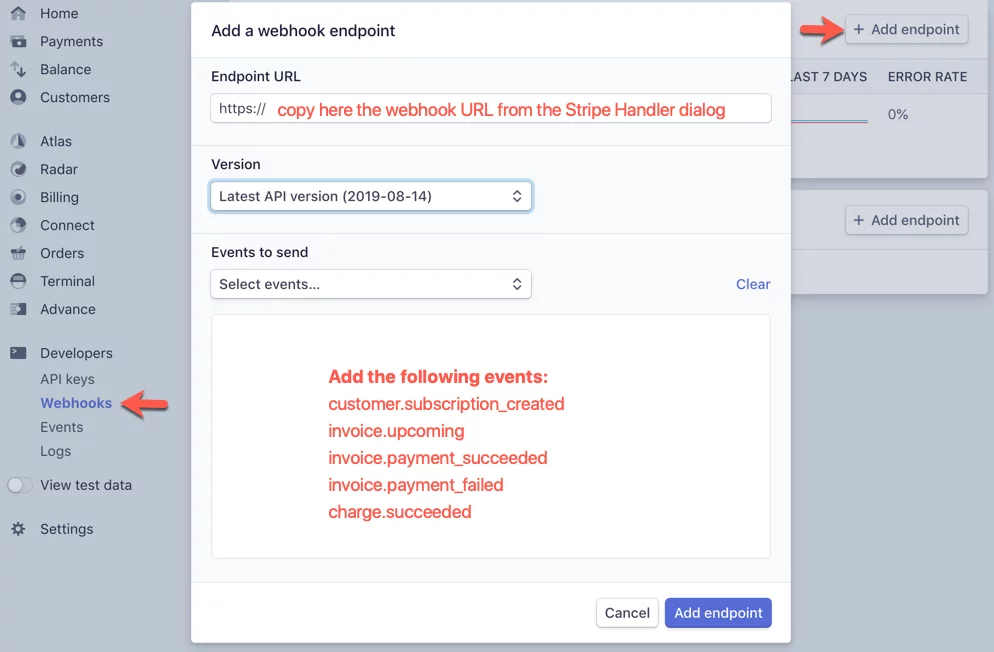
You can get the Endpoint URL from the Stripe Handler in the JReviews Dashboard as shown in the image below.
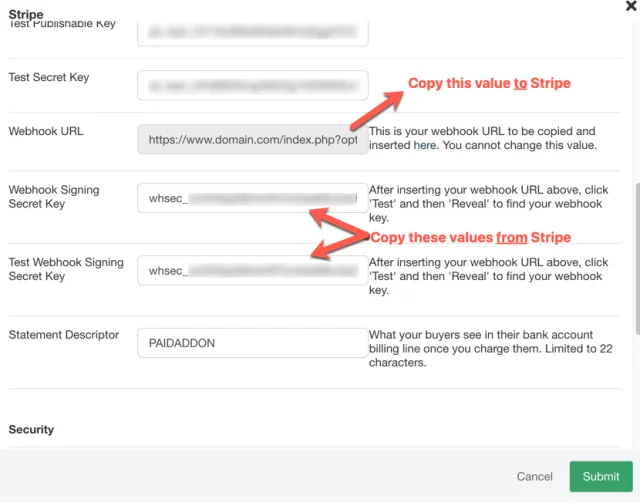
After that select the following 5 events to be sent by the webhook:
- customer.subscription_created
- invoice.upcoming
- invoice.payment_succeeded
- invoice.payment_failed
- charge.succeeded
Save the endpoint. At this point you'll be able to view the Signing Secret value shown below.
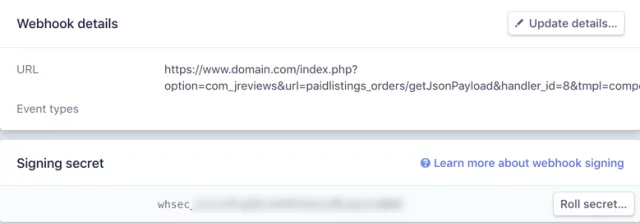
You need to copy this value to the Stripe Handler dialog in PaidListings.
Strong Customer Authentication (SCA)
This step is important if you accept payments from European clients. The new rule coming into effect on September 14, 2019, as part of PSD2 regulation in Europe, will require changes to how your European customers authenticate online payments. Card payments will require a different user experience, namely 3D Secure, to meet SCA requirements. Transactions that don't follow the new authentication guidelines may be declined by your customers' banks.
The Stripe Handler already takes care of SCA in the payment flow and will allow clients to perform the 3D secure authentication. However, for subscriptions that use recurring payments that may charge the client while not online, some banks may require re-authentication by the user. Stripe has made it easy to comply with this requirement through email and a hosted Stripe page.
Enabling Stripe 3D Secure Reauthentication Emails
The first step to enable re-authentication emails is to go to Stripe Dashboard → Settings → Stripe apps → Billing - subscriptions & emails.
Find the Manage payments that require 3D Secure section and enable Send a Stripe-hosted link for cardholders to authenticate when required. You can also enable the reminder emails and add several reminders if needed.

Customizing Stripe Checkout
The Stripe handler uses the Stripe-hosted checkout experience so payments happen at Stripe, meeting the most stringent security requirements. You can customize the checkout page directly in your Stripe dashboard branding page where you can upload a logo and set the colors you want to use for the checkout page and Stripe emails.
Click the above link to go straight to the branding page, or you can also find the page in Stripe Dashboard → Settings → Stripe apps → Checkout - checkout settings.
Then find Appearance, under Customize Checkout.
Notifications
You can manage all the notifications for Stripe directly under Add-ons → PaidListings → Email Notifications.
Make sure you review both the Single Payment Notifications and Subscription Payment Notifications if you are also going to use subscription plans.
Payments with Test Cards
You can test the payments without using a real credit card. To do this you need to change the Stripe Handler State setting to Sandbox. Make sure you've also followed the steps above to complete the settings for the Test Publishable Key, Test Secret Key, and Test Webhook Signing Secret Key.
Stripe provides a list of test card numbers you can use.
Finally, remember to switch the State setting back to Enabled when you are done

