EngageUsers
Add notifications, search alerts and as a bonus, a beautiful activity stream to your site.
Features
EngageUsers adds the following functionality to JReviews:
- Category and listing follows
- Search alerts for new listings
- Follow notifications via email, web push (OneSignal) and the site's notifications feed
- Site activity stream
- User activity stream tailored to the member preferences and related activities
- Slack integration for admin notifications
Requirements
Web Push Notifications
If you want to use Web Push notifications, you will need:
- A free OneSignal account https://onesignal.com/
- An SSL certificate so your site is accessed via HTTPS
JReviews Cron
Sending daily/weekly digests and search alerts requires setting up the cron on your server to run these tasks periodically. Read more about setting up the cron.
Queue Add-on
For best performance, it is recommended to use the Queue Add-on so tasks are queued and handled in a separate process that doesn't interfere with the user experience.
Initial Setup
Required Menus
Before you begin using the Add-on, it is important to create the following site menus:
-
Site stream
-
User stream
In Joomla, use the same menu and set the 'Type of Menu' in the 'Activity Stream' tab.
-
Messages
-
User Preferences
Joomla Menus
To create the required JReviews menus in Joomla, go to Menus and use find the menus under the JReviews Menu Types.
WordPress Menus
To create the required menus in WordPress, create new pages in Pages and use the JReviews Menu System in the sidebar to choose the menu types.
Activity Setup
You can setup activities and privacy in the Add-on configuration Activities tab.
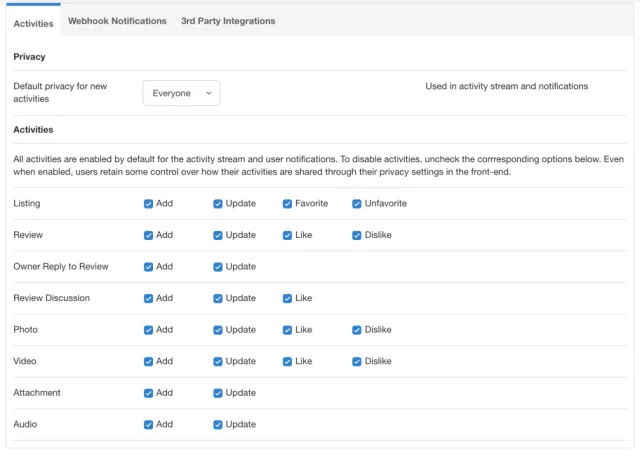
Here you can set:
Default Privacy
The privacy setting for activities is only for the activity stream and doesn't affect the visibility of content on the rest of the site. For example, if the new listing privacy is set to Registered or Only Me, that will affect the visibility of that activity in the stream, but the listing itself will remain visible to everyone on the site or will use the access settings for that listing from Joomla or WordPress.
Activities Types
Control which activities are available for use in the system. Unchecking activity-types prevents activities from being posted to the stream and included in notifications. Some activities with which higher frequency of usage or less relevance (favorites, likes, uploads) are automatically excluded from notifications (email, web push, and site messages) to avoid generating too many notifications to users.
Types of Notifications
Periodic Notification
To process daily and weekly notifications it's necessary to set up the JReviews Cron. It's not possible to use site visits to run these tasks. We recommend setting the Cron to run every minute so if you've already set up the Cron, you should also modify the frequency to every minute.
Immediate Notifications
To process immediate notifications, we recommended setting up the Queue Add-on. By using the Queue Add-on, site users don't need to wait until the notification is sent to complete an action. This could take a long time if many people are subscribed to receive the notification.
Push Notifications
Create a OneSignal App
The first step to configure OneSignal in EngageUsers is to create a free OneSignal account and create an App to use with the Add-on.
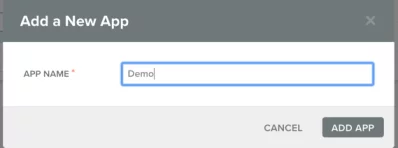
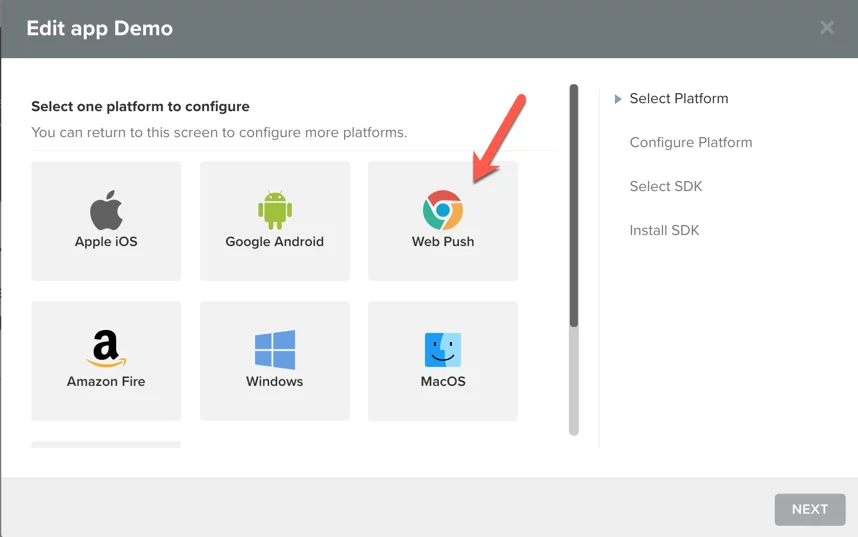
Web Push Platform
Select the Web Push platform.
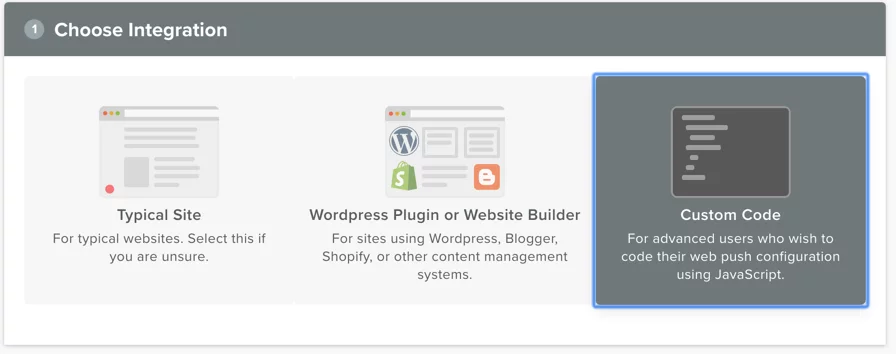
Custom Integration
For integration select Custom Code.
Site Details and Custom Icon
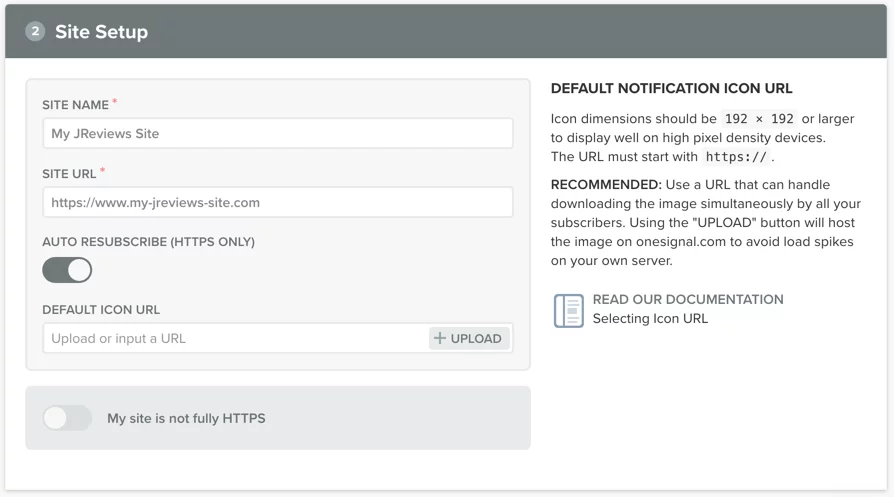
Next, fill out the Site Name and Site URL, and set the default icon to use for notifications.
OneSignal SDK
In this step download the OneSignal SDK. Next, unzip the downloaded package and upload the 3 files to the root of your site. To confirm the files are readable, try accessing them directly using the browser. Replace your domain in the following links and you should be able to see the file contents:

├── https://my-jreviews-site.com/manifest.json
├── https://my-jreviews-site.com/OneSignalSDKUpdaterWorker.js
├── https://my-jreviews-site.com/OneSignalSDKWorker.js
App ID and REST Api Key
Get your App ID and REST API Key from OneSignal under Settings / Keys & IDs
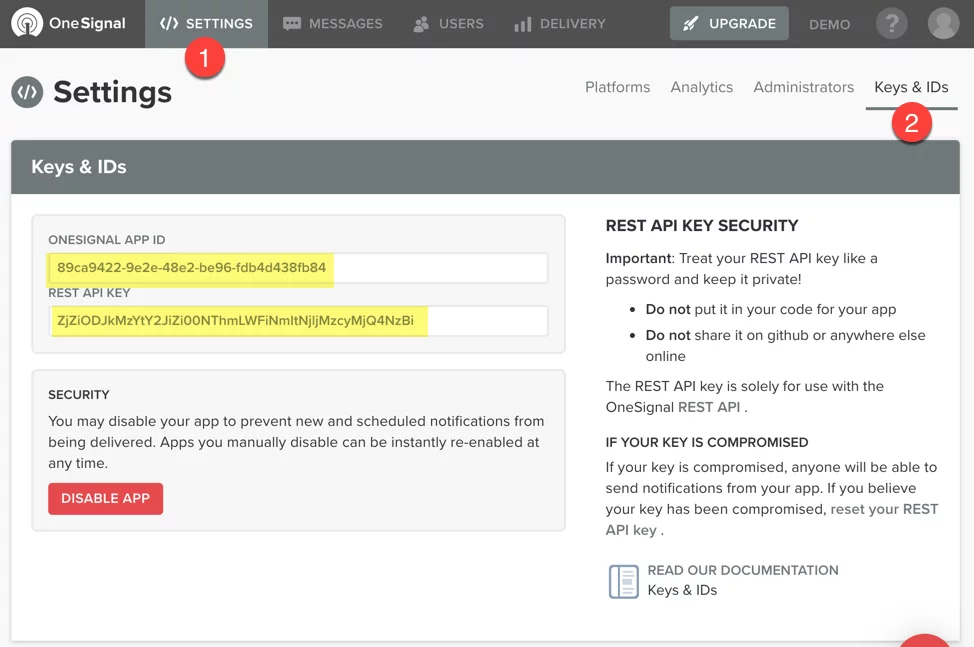
The highlighted keys in the image below are for documentation purposes and will not work. You need to use the ones provided in your OneSignal dashboard.
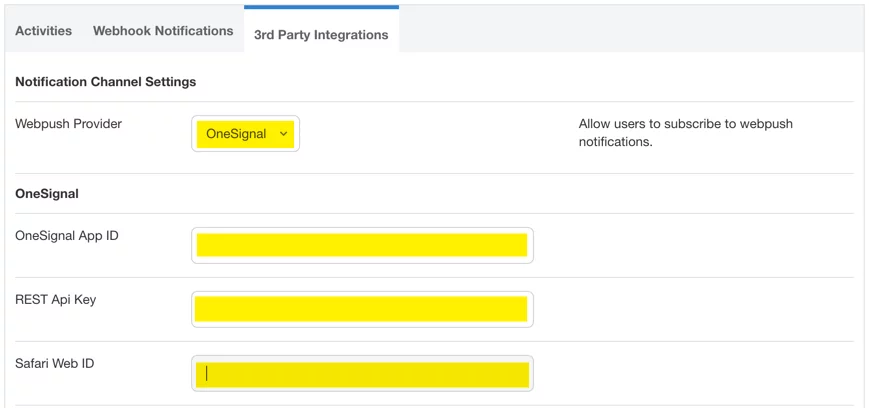
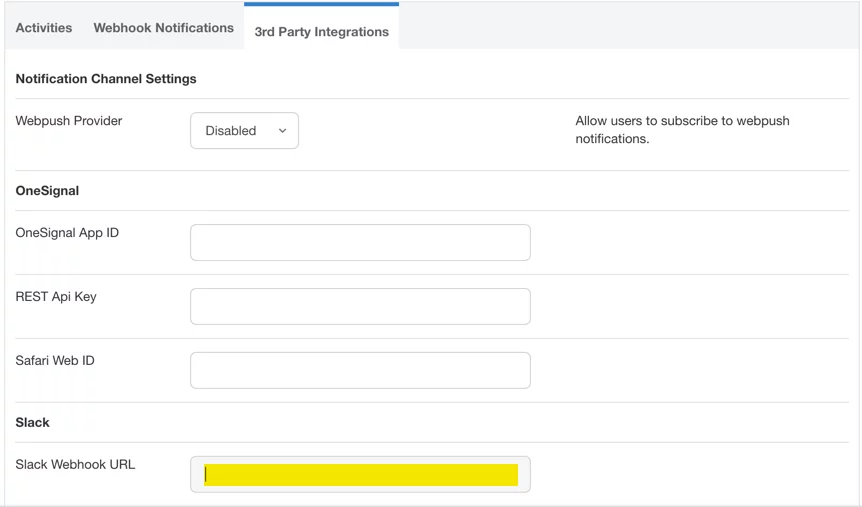
Copy the App ID and REST API Key to the 3rd Party Integrations tab in the Add-on administration.
Safari Notifications
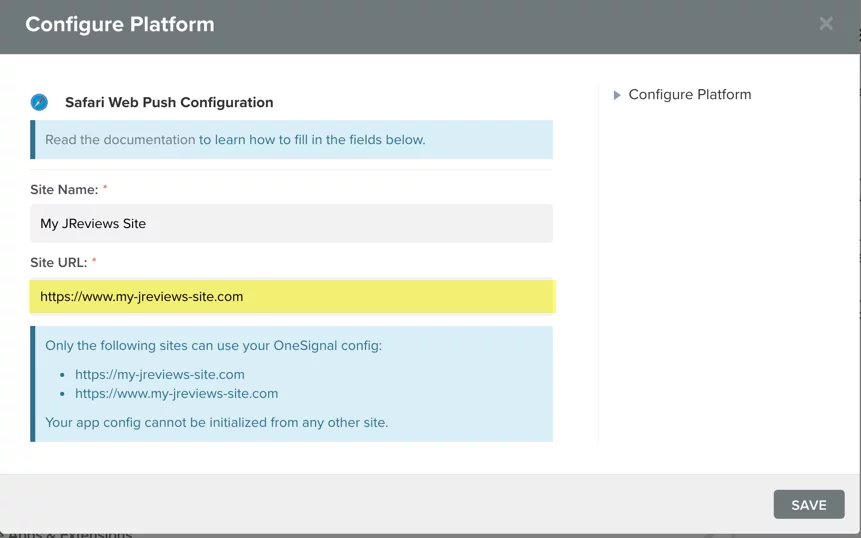
Safari notifications require a different Web Id. On your App in the OneSignal site go to Settings / Platforms / Apple Safari.
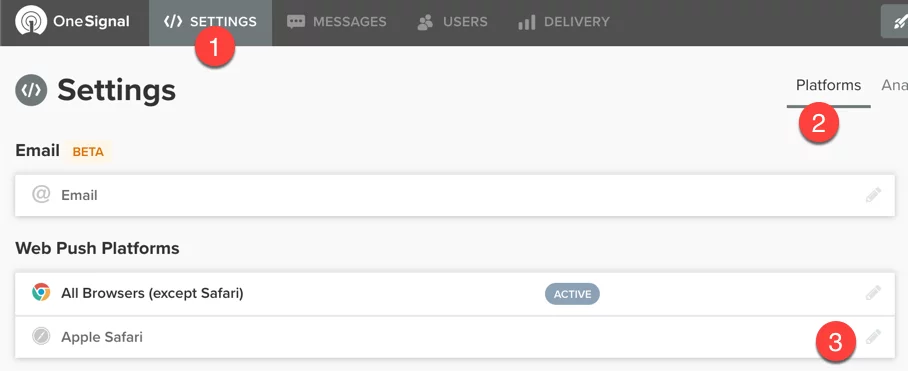
Add the Site URL, then save.
Now, click again on Apple Safari to re-open the dialog and copy the generated Web ID to your site under EngageUsers / Configuration / 3rd Party Integrations.
Upload Custom Icon for Safari
On the OneSignal site, in the same dialog where you copied the Web Id for Safari you will now see a checkbox at the bottom to set a custom icon for Safari Web Push notifications.
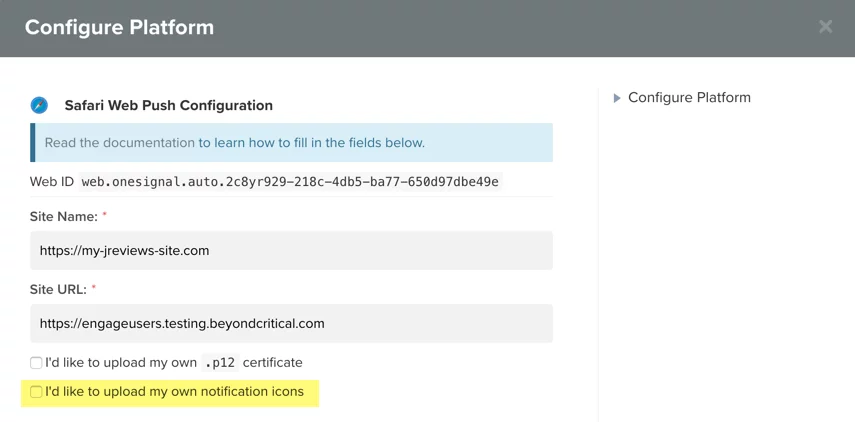
Set the Safari icon at this point because once users are subscribed, they will only be able to see the icon that was set at the time they subscribed. If you didn't set an icon, that would be the default OneSignal icon.
Slack Integration
Create Slack Webhook App
The first step is to create a new Slack Webhook App in your Slack workspace.
- Log in to your Slack workspace
- Go to the browse apps page for your workspace. The easiest way to do this is to modify the following URL and replace
your-workspacewith your workspace URLhttps://your-workspace.slack.com/apps. - Now use the search input to look for
incoming webhooks

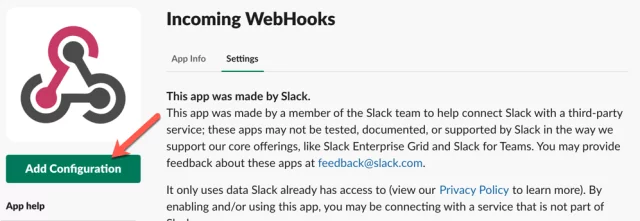
- Select the Incoming WebHooks App, then click Add Configuration
- Select the channel where you would like to receive the notifications, then click Add Incoming Webhooks Integration

Webhook URL
Copy the Webhook URL provided and add it to the 3rd Party Integrations tab.
Choose Activities
Finally, choose the activities you want to receive via Slack in the Webhook Notifications tab.
Frontend Features
Site and User Activity Streams
Users can access the streams using the menus you created in the Initial Setup section.
Site Notifications
Users can access their in-site notification messages from the menu you created in the Initial Setup section.
Follows for Categories and Listings
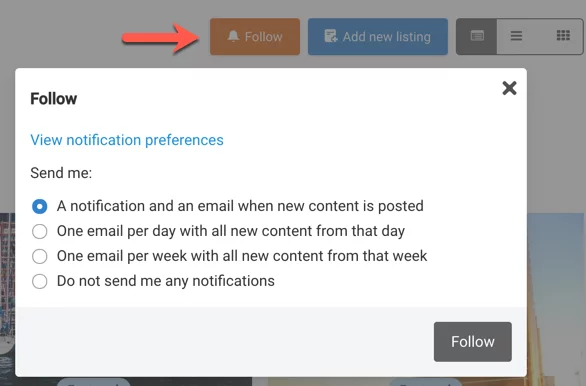
The Add-on will automatically display a new Follow button in category and listing detail pages to allow members to receive notifications for activities related to the topics in which they are interested.
Search Alerts
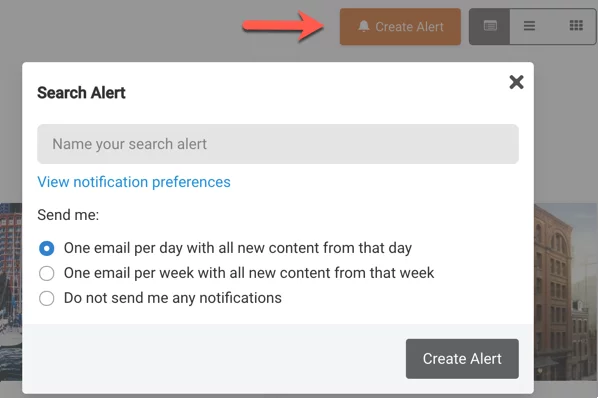
The Add-on will automatically display a Create Alert button in search result pages to allow members to receive notifications when new listings matching their search criteria are added to the site.
Notification Preferences
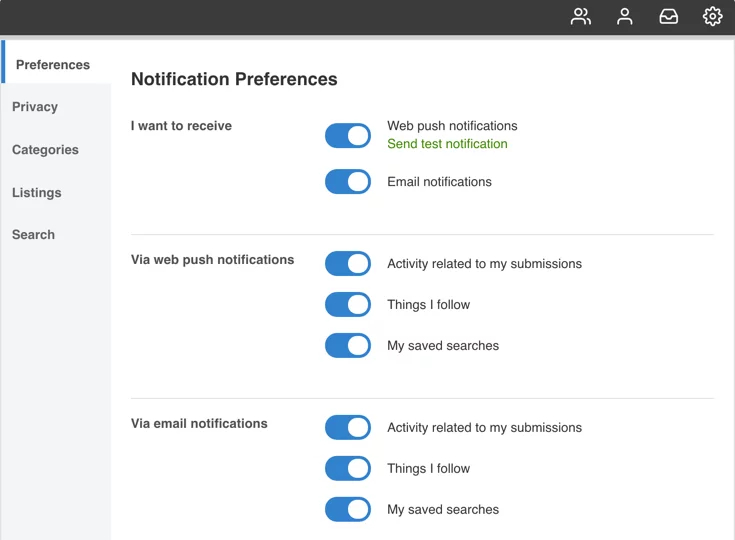
Users access the notification preferences from the Notifications Preferences, from within follow dialog, create alert dialog, and the activity stream.
They can select the notification channels and types of notifications that they wish to receive, and also manage existing follow and search alert subscriptions.
Recommendations
Testing Notifications
To test notifications you need to use at least two different users:
- One that follows and creates alerts
- One that generates site activity (listing, review, etc).
Users will not get notifications if:
- They are the ones triggering the activity. For example if you follow a category and you submit a listing or a review in that category you don't receive a notification. Only other users receive it.
- Someone other than the owner of the activity (listing owner, review owner, etc.) updates the activity. For example, if an admin updates a listing on behalf of another user a notification will not be sent.
Notification frequency
- Immediate notifications are sent right away, unless you have the Queue Add-on active and are queuing email notifications.
- Daily notifications are sent once every 24 hour period. If a user receives a notification now, he won't receive another one until at least 24 hours later. They are not sent at a specific time, they are sent in batches throughout the day to avoid sending thousands of emails at the same time. The system retrieves a batch and sends the notifications. Then those are marked as sent, and process is repeated.
- Weekly notifications work similar to daily notifications.
You can manually trigger the cron by copying the cron URL from the JReviews administration and pasting it in the browser URL.
Re-sending notifications
The following only applies to daily and weekly notifications because there's no way to re-send immediate notifications.
You can reset the last sent date for user subscriptions to trigger the notifications again. The database table #__jreviews_engage_follow, which contains individual user follows and alerts, has a follows_notify_sent column that keeps track of the last notification sent for a particular subscription. If the value is NULL it means nothing been sent for this subscription. To re-send past notifications you can reset the value to NULL or change it to a past date for testing purposes, then run the browser URL.
Web Push Message Icons
If you didn't upload your custom icons while performing the OneSignal configuration, we recommend that you do this as soon as possible. In some cases, like when using Apple Safari, subscribed users will see the icon that was set at the time they subscribed, regardless of whether you change the icon later.
Email Provider
Since the Add-on is all about notifications, the higher the number of subscribers the more emails sent from your server. We recommend using an email provider that gives you access to sent mail logs where you can see that everything is working as expected.
Email Testing Provider
For testing purposes, to prevent test notifications from being sent out to site users, we recommend using something like Mailtrap. When using the SMTP details provided by Mailtrap, all emails sent from your site are delivered to your Mailtrap inbox, instead of going out to your site users.
Cookies and Privacy
Only logged in users can subscribe for push notifications in EngageUsers and the login functionality of your site requires cookies, by the time the user subscribes for push notifications, he already accepted the cookie policy on your site.
The free OneSignal plan will collect some user data, so we recommend updating the privacy policy on your site to reflect this. Our custom implementation of OneSignal ensures that users agree to the privacy policy terms before seeing the browser's native notification prompt.

