iReview Joomla 3 Template
Complete guide for the iReview Joomla Template - a light and fast responsive template for Joomla 3. Learn installation, configuration, module positions, and customization options.
Features
- Light and fast
- Clean, minimalistic design
- Uses HTML5 and CSS3
- Bootstrap 3
- Responsive layout
- Two sidebars, both can have any custom width
- Easy to customize, add custom styles and scripts via template parameters
- Multilevel menu navigation, both horizontal and vertical
- Slideout menu for mobile devices
- Mobile detection to prevent specific modules from loading on smartphones
- Google Web Fonts (preselected best fonts from Google's font service)
- Scroll to top option
- 32 color styles available in different variations
- 41 module positions which can be split into multiple columns
Installation
If you already know how to install a Joomla template, you can skip over to the next sections.
Download Template
Download the template installation zip package from the Client Area.
Install Template
In the administration area of your Joomla site, go to Extensions → Install. Find the Upload Package File tab, click browse for file and select the downloaded zip package. Then click Upload & Install.

Set Default Template
The next step is to enable the template. Go to Extensions → Template Manager, select iReview 3 template and click Default.

Template Settings
Template settings allow you to change basic things like logo, styles, social links, and more advanced features like cookie consent, adding custom CSS and Javascript.
The template settings are split into 5 tabs:
- General settings - Logo, favicons, copyright, 3rd party scripts, etc.
- Layout - Responsive layout, mobile menu, sidebars
- Styles - Styles of individual page wrappers
- Social Media - Links to your site's social media pages
- Customizations - CSS & javascript settings
General Settings
Logo
By default, the template will show the name of your site as the logo. Select a default site logo image and optionally a mobile logo image (which will replace the default logo on small screen devices).
You can publish the logo to the Header area or the Topbar area. Choose the Topbar only if your logo is small because Topbar height is 40px and taller logo images will be scaled down.
If you choose to show the logo in the Header area, select the number of grid columns to reserve for the logo. The remainder will be allocated to the Right of logo position. For example, if you select 6/12, both the logo and the Right of logo position will take 50% of the available screen size.
If you show the logo in the Topbar or if you disable the logo, the Right of logo position will display in the whole header row.
Favicon
The favicon is an image used by browsers to represent a web page, and most recently it has also started to appear next to Google search results. We recommend using a Favicon Generator to generate all the different sizes required for multiple devices. You need to prepare a single image file (preferably with square dimensions, at least 260x260 pixels), upload it to the generator and it will give you differently sized images for all platforms and the favicon code.
Upload the images to the root folder of your site and paste the code to the Favicon code setting.
Copyright
iReview provides a simple way to add copyright text to the footer of your website. You can use custom text and the {current_year} tag which is automatically replaced with the current year, and the {site_name} tag which is automatically replaced with the site name as defined in the Joomla configuration.
Select the number of grid columns to use for the copyright text and the rest will be allocated for the position-15 module position. For example, if you select 6/12, both the copyright text and the module position will use 50% of the screen size. If you select 12/12 for the copyright text, the position-15 module position will be disabled.
If you need to use custom content as the copyright text, disable the Show copyright text setting, and instead publish a custom module to the position-15 module position.
Web Fonts
iReview by default uses the Helvetica and Arial fonts, but you can choose a different font from a selected number of Google Fonts. The template has a separate font setting for the body text, headings and logo.
If your site isn't in English, select an appropriate Character Set.
3rd Party Scripts
3rd Party Scripts settings allow you to choose which scripts will be loaded and how. Examples of using 3rd party scripts are available in chapter 8. Try to limit the use of 3rd party scripts for faster loading times.
Cookie Consent (EU Law Compliance)
If your site is EU based and you want to show the Cookie Consent message, you can enable it here. Once new site visitors click the "I agree!" button, they will no longer see the message. This is what the message looks like by default

Google Analytics and Google Tags Manager
If you want to use Google Analytics or Google Tags Manager the code is already included in the template. You just need to add the Google Tags Manager ID or Google Analitics ID from the respective account and paste it in the corresponding setting. Then enable the feature. You can check that the code is loading by examining the source of the page in the browser.
Other
The Display Login Form on the Offline page setting allows you to choose how to display the frontend login form when the site is offline. The options are:
- Never - the login box will not be displayed
- Always - the login box will always be displayed
- Appear after pressing the L key on keyboard - the login box will fade in after pressing the L key on keyboard. Useful if you don't want regular users to try to login when the site is offline.
Template Layout
Responsive Layout
The template is responsive by default and the main content is centered with a 1200px maximum width. If you want to reduce maximum width, enter the number of pixels to the Maximum width setting.
If you want the content to occupy 100% of the browser width on all devices, enable the Content 100% width setting for individual page wrappers in the Styles tab.
Slideout Menu
The main horizontal navigation menu of your site can be transformed to a Slideout menu on mobile devices. The template allows you to choose the breakpoint used to convert the menu.
Use the Name of the menu(s) to convert (lowercase, no spaces) setting to specify which menus will be converted to the slideout menu. To find out the names of your menus, in Joomla admin, go to Menus → Manage and check the Menu Type:

There are two types of slideout menus:
- OffCanvas - when the visitor clicks the menu icon, the slideout menu will appear and push the rest of the page outside the visible screen.
- Overlay - when the visitor clicks the menu icon, the slideout menu will appear as overlay above the rest of the page.
The template allows you to automatically move Topbar modules or Topbar social media icons to the Slideout menu on small screens.
Sidebars
iReview provides two sidebars (primary and secondary) and both can be displayed on either left or right side of the main content.
The sidebars will appear only if you publish modules to one of the sidebar module positions (position-5, position-6, position-7 for primary sidebar and position-5a, position-6a, position-7a for secondary sidebar).
For sidebar dimensions you can choose between:
- Grid columns - the sidebars will use percentage width and their size will be narrower on smaller devices.
- Fixed width - the sidebars will have the same width on all devices - recommended if you plan to have fixed size banners in the sidebar.
Styles
In the Styles tab you can set a default link color and styles for different page wrappers.
Header, Content and Footer wrappers are displayed by default and other wrappers will appear only if you publish modules to their module positions.
For each wrapper you can choose a different background color and make its content fill 100% page width.
To Topbar Wrapper can be optionaly made to appear Always on top.
iReview provides 32 different color styles, but you can also choose a custom background color using a color picker. Even if you choose a custom background color using the color picker, also select the most similar default background color to make sure the correct font colors will be applied.
In addition to being able to choose a custom background color, you can also upload a background image for wrappers. You should use a large background image beause it will fill all available space of the individual wrapper. The image will be centered horinzontally and you can choose the vertical alignment (top, center, bottom). A scrolling mode setting is also available where you can choose the fixed scrolling mode where the background image won't scroll down with the rest of the page achieving a parallax effect.

Social Media
iReview provides an easy way to add buttons that link to your site's social media profiles. Enable individual social buttons, paste links to your site's profile pages and adjust the link titles. You can also choose if you want to show the social media buttons in the topbar or footer.
Example of social media buttons in the topbar:

Customizations
CSS
There are two ways to add custom CSS to the template:
- Enable Load custom.css file and add your code to the /templates/ireview3/css/custom.css file. Use the Version override for custom.css setting to add a custom version number every time you update the custom.css on a live site for returning visitors to see new updates without clearing browser cache.
- Paste the custom CSS code to the textarea in template parameters - useful for small CSS customizations.
Javascript
Load custom head scripts from textarea below - any code that you add to the textarea will be included in the <head> part of the template, useful for scripts that need to be loaded from the head element like fonts from CDNs.
Load custom footer scripts from textarea below - any code that you add to the textarea will be included before the closing </body> tag, useful for custom scripts that don't need to be loaded in the <head> tag.
Module Positions
The template has a large number of module positions to choose from.

Assignments
You can assign the module position when creating and updating modules in the Joomla Module Manager:

Positions component-top-tabs, component-bottom-tabs, sidebar-accordion and sidebarb-accordion are special positions and modules that you publish to them will be automatically converted to Bootstrap tabs and accordions:


Modules in Slideout Menu
There are 2 additional module positions for mobile devices that are used when the slideout menu is visible:

Multiple Modules Per Position
Whenever you publish more than one module to the same module position, they will be displayed one below the other. If you want to display modules side by side within a single module position, you can use the Bootstrap grid setting. For example, if you want two modules to display side by side, select 6 in the Bootstrap Size parameter for both modules.

Any combination of grid columns is possible, the important thing to remember is that there must be total columns 12 columns in a single row (module position).
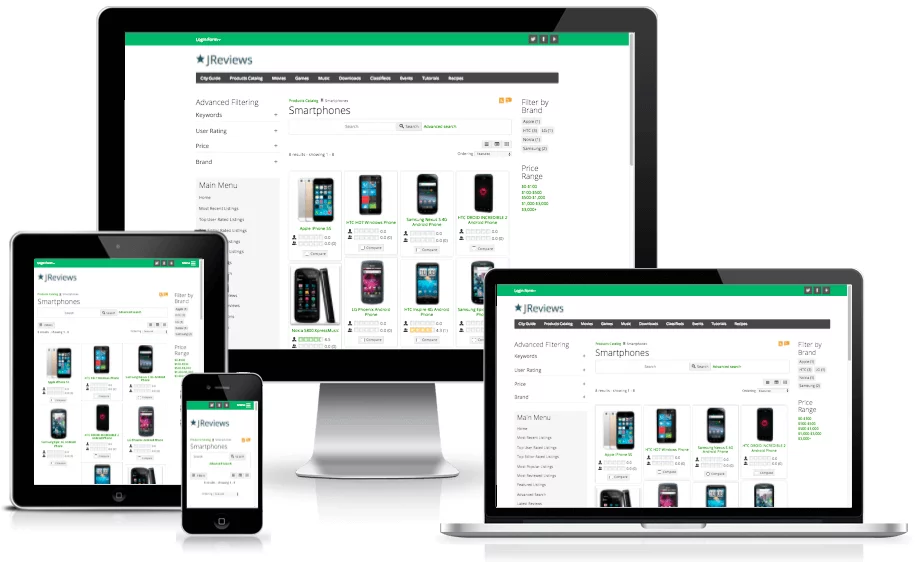
Flexible Layout And Responsive Grid
iReview comes with powerful layout options and a responsive grid system which adapts to various resolutions of different devices (desktops, tablets, smartphones). There are more than 40 module positions and every position can be split into multiple columns to be able to display modules side by side. Two sidebars are available, each can be placed left or right of the main content and they can use either grid based dimensions or any custom fixed dimension that can be specified in the template settings.
Mobile Features
For better usability on mobile devices, iReview comes with a new off-canvas slideout menu. The menu is activated by tapping the menu icon in the topbar. The mobile menu supports unlimited levels of menu items, just like regular menus. For better performance on mobile devices, iReview allows you to prevent specific modules from loading by using a Mobile Detect feature.

Colors And Styles
The template comes with 32 color styles and makes it easy to use multiple color styles at once for different page wrappers and modules, with an option to override specific color styles using color pickers. You can also assign modules to positions inside dropdown menus, and for every dropdown menu you can choose if it will be activated by mouseover or a click.

Module Styles
iReview includes built-in module styles that can be applied to modules using the Module Class Suffix parameter. These styles provide consistent styling across your site without requiring custom CSS.
Applying Module Styles
To apply a module style, go to the module settings in Joomla Module Manager and find the Module Class Suffix parameter under the Advanced tab.

Enter the style class name in the Module Class Suffix field:

Available Module Styles
Basic Styles

Rounded Borders
Use the module-round class to add rounded corners to module containers:

Visible Borders
Use the module-border class to add visible borders to modules:

Padding Options
Control internal spacing with padding classes:

Module Title Styles
You can style module titles separately using the Header Class parameter in the module settings:

Title with Background

Multiple Header Classes
You can combine multiple header classes for advanced styling:

Menu Styles
The template provides several menu styling options that can be applied using the Menu Class Suffix parameter in the Joomla Menu Manager.

Vertical Menus
Create vertical navigation menus:

Horizontal Menus
Create horizontal navigation bars:

Responsive Menu Behavior
Menus automatically adapt to different screen sizes using Bootstrap breakpoint classes:

Modules in Dropdown Menus
You can publish modules inside dropdown menu items for enhanced functionality.

Step 1: Create a Text Separator menu link:

Step 2: Add the module position name in the menu item notes:

Step 3: Assign your module to that position:

Click-to-Open Dropdowns
By default, dropdown menus open on hover. You can change this to click-to-open behavior:

Add the dropdown-click class to the Menu Class Suffix:

Bootstrap 3
iReview uses Bootstrap 3. It uses Bootstrap's mobile first responsive grid system and also makes it easier to use some of the Bootstrap components like tabs and accordions. All other Bootstrap 3 components can be used when customizing both the template and themes of 3rd party Joomla extensions.
Easy To Customize
Compared to most templates these days that use complex frameworks, setting up iReview is a breeze, and it has fewer files so it is much easier to customize. You can even add custom CSS styles directly in template parameters and include custom scripts in the head or body of the template. There are many other features like more control over the offline page, pre-selected quality fonts from Google CDN, scroll to top button and social media icons.